What is Stroke in Photoshop: A Concise Guide for Users
Adobe Photoshop is a powerful tool used by designers and photographers worldwide for creating and editing digital images. One of the essential features in Photoshop is the ability to add a stroke around an object, which can enhance both text and shapes within your designs. Strokes are essentially outlines that can be applied around any selected area, allowing designers to create compelling visual effects and emphasize specific elements.
The stroke feature in Photoshop offers a variety of options to customize the appearance of the applied outline. You can choose the color, width, and style of the stroke, as well as control its position, blend mode, and opacity. Whether you're looking to add a simple, solid outline or a more complex patterned border, mastering the stroke function in Photoshop is crucial for refining your design projects.
Key Takeaways
- Photoshop's stroke feature allows you to add customizable outlines to text and shapes within your designs.
- A variety of options, such as color, width, and style, are available when applying strokes in Photoshop.
- Mastering the stroke function can help enhance your design projects, adding visual interest and emphasis to specific elements.
Understanding Photoshop Strokes
Strokes in Photoshop are an essential tool for designers to create outlines and borders around objects, text, and other elements. The stroke effect can be applied to layers, selections, and paths. When applied, it produces a line of a specific color, width, and style around the chosen item.
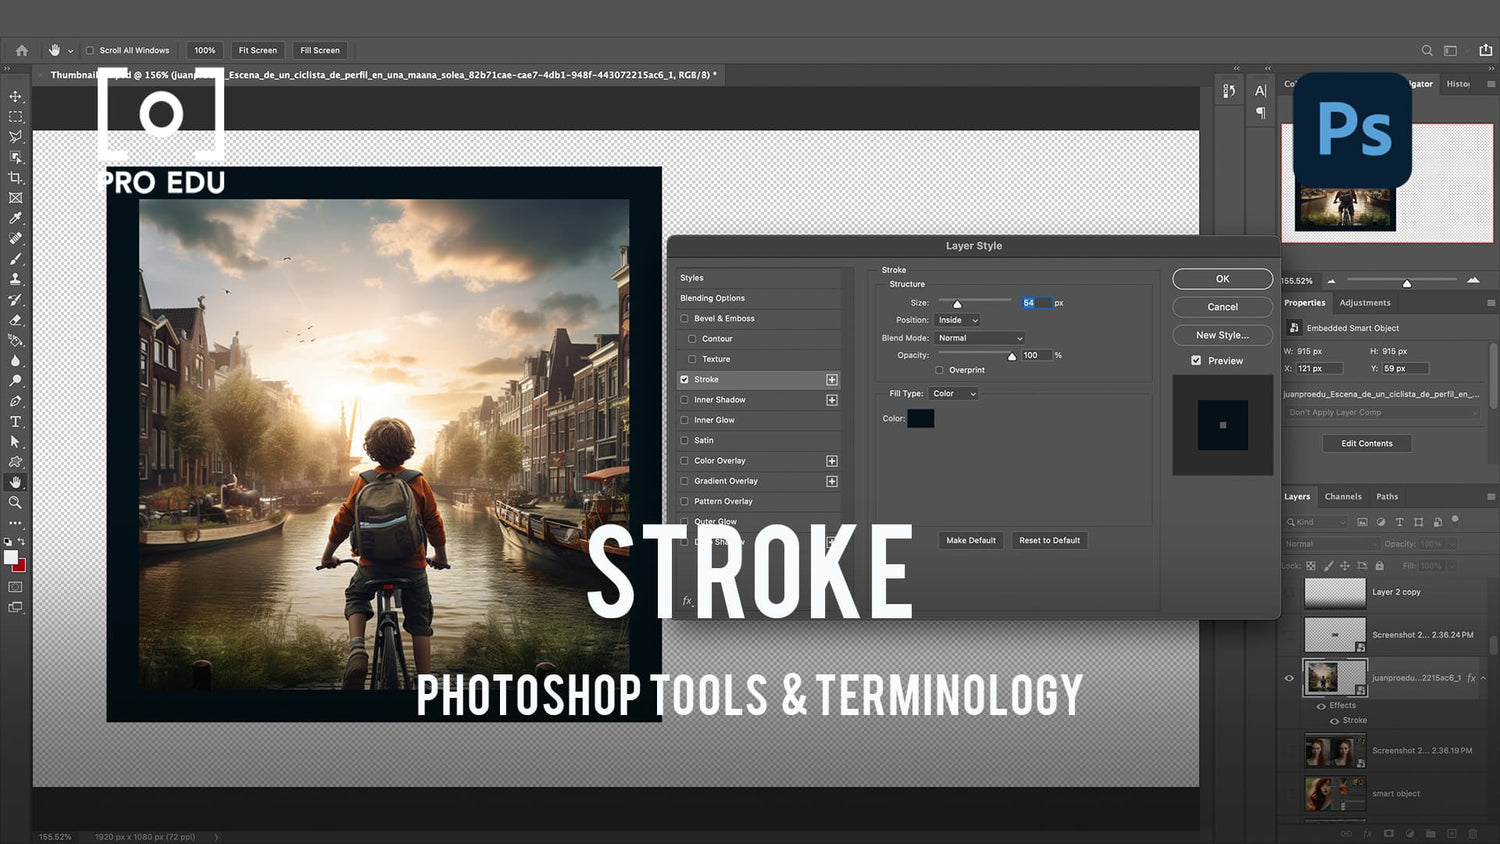
To add a stroke in Photoshop, we can use the Layer Styles panel, which provides us with various options and settings. We can choose the color, size, position, blend mode, and opacity of the stroke, allowing us to achieve various creative effects in our designs. For more advanced Photoshop techniques, PRO EDU offers professional photography and Photoshop tutorials.
Creating solid-color lines, colorful gradients, and patterned borders is made possible by the Stroke effect. However, it's important to remember not to overuse the effect and be mindful of the overall design balance. By using the stroke effect wisely, we can enhance our designs and make them more visually appealing.
In summary, understanding Photoshop strokes is essential for designers who want to create outlines and borders on their designs. By utilizing stroke options and settings, we can create attractive and customizable borders.
How to Create a Stroke in Photoshop
In Photoshop, a stroke is an outline applied to a selection, layer, or path to enhance its appearance. To create a stroke, we first need to decide on our base element, such as text, shapes, or layers.
Let's start with text. After typing out our desired text using the Text Tool, we can apply a stroke by right-clicking the text layer in the Layers panel and choosing "Blending Options." In the Layer Style window that appears, select "Stroke" and adjust the size and colors accordingly.
When working with shapes or lines, we generally utilize the Pen Tool or the Brush Tool to create paths. With the Pen Tool active, select "Paths" from the Options bar, and draw the desired shape. To stroke the path using the Brush Tool, either right-click the path and choose "Stroke Path" or switch to the Brush Tool and click on the "Stroke Path" icon in the Options bar. It's a good idea to place strokes on a new layer for better flexibility in editing.
In case we're looking to stroking layers, first, we need to make a selection around the content of the layer. This can be done using any of the selection tools like the Marquee Tool or the Lasso Tool. Once the selection is made, go to the "Edit" menu, choose "Stroke," and specify the color, width, and other attributes for the stroke in the "Stroke" dialog.
No matter which element we're adding a stroke to, it's important to experiment with colors, sizes, and positions to achieve the desired effect. Additionally, being familiar with extra options, like blending modes and opacity settings, allows us to get more creative with our strokes and enhance our images.
Enhancing Strokes with Layer Styles and Effects
When working in Photoshop, we can enhance our strokes by using layer styles and effects. Layer styles can be found within the Layers panel and offer a variety of customizations. Throughout this section, we will explore different options for strokes and how they can be improved with the help of layer styles and effects.
Firstly, let's discuss the stroke options available in Photoshop. To effectively use strokes, we must have a clear understanding of the various options provided, such as fill, style, and pattern. A stroke can be filled with a solid color, gradient, or even a pattern. The style determines the stroke's positioning, be it inside, center, or outside the layer it is applied to. Each style comes with unique effects that can enhance the overall look of the stroke.
Selecting the most suitable stroke alignment and color is key to creating an appealing design. Utilizing elements such as text layers and background components help ensure that the stroke complements the other elements. To further customize the stroke, you can apply a blend mode or adjust the opacity and blending options within the layer effect settings. This allows us to create visually appealing and dynamic stroke effects.
Another important aspect to consider when using strokes in Photoshop is the layer styles. From shadows to bevels and embossing, layer styles allow us to modify the overall appearance of a stroke. For example, adding a subtle shadow effect might help us emphasize our stroke or text, while using bevel and emboss can provide a sense of depth or dimension. Be sure to explore the many available effects to find the best combination that works for your specific design needs.
In conclusion, strokes in Photoshop are a powerful tool that can be enhanced through the use of layer styles and effects. By mastering the stroke options, understanding alignment and blending modes, and experimenting with layer styles, we can vastly improve the quality of our design work in Photoshop.
Advanced Stroke Techniques in Photoshop
When working with strokes in Photoshop, it's important to understand the various options available to create stunning effects. In this section, we will cover a few advanced stroke techniques that can help elevate your designs.
By utilizing layer styles, we can add strokes and borders to outside shapes and create solid-color lines, colorful gradients, and patterned borders. Layer styles offer several blending options, allowing us to experiment and find the perfect combination to enhance our designs.
Gradients are a popular choice for incorporating visual interest and depth to strokes. To apply a gradient stroke, navigate to the Layer Styles panel and choose the Gradient Overlay option. Here, you can customize colors, blending modes, and opacity to achieve a seamless, professional look.
Another interesting technique involves applying brush strokes to the path. First, create a path using shape tools or the pen tool, and then switch to the brush tool. Choose a desired brush and set the color, size, and blending mode. Once the brush is set, simply right-click on the path and select 'Stroke Path' to apply the brush stroke along the path.
Experimenting with various brushes and filters can yield unique outcomes and enhance the visual impact of your strokes. Don't forget to save your layer styles and brush presets to reuse them in future projects, streamlining your workflow and maintaining consistency in your designs.
By incorporating these advanced stroke techniques, we can take our Photoshop creations to the next level and craft captivating visuals that stand out in today's competitive design landscape.
Resolving Common Issues and Troubleshooting Strokes in Photoshop
When working with strokes in Photoshop, we may encounter some issues. In this section, we will address common problems and provide solutions to help maintain a smooth workflow.
While using the Stroke command, we might notice that the stroke is not being applied properly. To resolve this, ensure that the correct selection or path is chosen before applying the stroke. Also, double-check the stroke options, such as size, position, and color, before clicking "OK".
Another issue could be related to the fill command. If the fill does not uniformly cover the desired area, inspect the blend mode and opacity settings within the Fill dialog box. These settings might need to be adjusted to achieve the desired results.
When working with presets for stroke or fill, sometimes we might not find the desired options. To add more presets, click the gear icon in the presets panel and load your preferred preset libraries. This will expand the available preset options to include custom brushes, gradients, and patterns.
Occasionally, we may want to apply a stroke to an adjustment layer in Photoshop. However, adjustment layers do not support strokes directly. A workaround is to use the Layer Styles panel to add a stroke onto a regular layer underneath the adjustment layer. This will achieve a similar effect.
To sum up, when facing challenges with strokes in Photoshop, it is essential to examine the stroke command, fill, presets, selections, and stroke options settings. By troubleshooting these areas, we can overcome potential problems and ensure a more efficient workflow.
Frequently Asked Questions
How do I add a stroke to an image in Photoshop?
To add a stroke to an image in Photoshop, first, make a selection or choose a layer. Next, go to Edit > Fill or select the path and choose "Fill Path" from the Paths panel menu. In the Fill dialog box, choose one of the options for "Use," or select a custom pattern source.
What are some popular Photoshop stroke styles?
Some popular Photoshop stroke styles include solid color, gradient, and pattern. You can adjust the opacity, size, and blending mode to create a variety of effects. The stroke can also be applied to the inside, center, or outside of a path or object source.
What is the shortcut for adding a stroke in Photoshop?
There isn't a specific keyboard shortcut dedicated to adding a stroke in Photoshop. However, you can quickly access the Fill dialog box by pressing Shift + F5, which allows you to adjust stroke settings.
How do I create a pointed stroke in Photoshop?
To create a pointed stroke in Photoshop, consider using the Pen Tool to draw your path with sharp angles. Once complete, set the stroke width and align it based on your desired result. You can also convert rounded endpoints to sharp edges by adjusting the stroke options in the Properties panel.
Why is the stroke option greyed out in Photoshop?
The stroke option may be greyed out in Photoshop if you are trying to apply it to an unsupported layer type, like a Smart Object or a locked layer. To resolve this issue, convert the Smart Object into a regular layer by rasterizing it or unlock the layer if it's locked.
Where can I download additional stroke presets for Photoshop?
You can find additional stroke presets for Photoshop online by searching for resources like brush packs or pattern libraries. Websites like DeviantArt, Creative Market, and Brusheezy offer downloadable stroke presets created by artists and designers, allowing you to expand your stroke options and effects.


