Yes, an enlarger makes a good copy stand but generally require some customizing to attach a camera, as your setup seems to have. It’s a bit disappointing that enlarger manufacturers didn’t make them to more easily convert to a copy stand. Looks like you have a film camera attached?
I use polarizer sheets as well, for photographing paintings, photographic prints etc. Works so well to eliminate reflections.
Yes, mine came like that. Got it at a swap-meet for $15! It is nice to have a platform at right-angles to the base, but it is very over-built. One could just as easily attach a ball-head and do the alignment by hand. Or better yet, something like the Manfrotto 410 gear-head, which one could calibrate by looking at a mirror, then clearly mark the knobs for an easy return to plumb-and-square if it gets moved.
Good eye! That’s the Olympus OM-4T, on the Olympus Focusing Rail, which makes fine-tuning easier than trying to crank the enlarger platform up and down by tiny increments.
Everything is held together with Manfrotto 394 quick releases, which it looks like you are using, too.
These things are strong as a horse, and more secure than Arca-Swiss clamps. I even put one on the bottom of my Kodak Carosel projector, so I wouldn’t have to mess around with books under legs when I was invited to give a presentation — just clamp it on the tripod and go! But they are a bit unwieldy when attached to smaller things.
So I made some of my own QR plates for the Manfrotto 394 out of aluminum 1/2" plate. I cut the bevel on a table saw with a carbide blade! (We don’t need no steenkeen CNC!) I can send you the specs if you want to roll your own.
On the bottom is an Icom R7000 receiver, 100kHz to 2GHz.
Next is an Icon IC-735 HF transceiver, 100 watts , 160 to 10 metres. The little box to the left is a controller for the Icom antenna tuner.
Next up is a home-brew power distribution box, takes 12VDC and routes it to everything through appropriate circuit breakers, and has some Anderson Powerpole™ connectors for plugging other stuff in. To the left is a 20 watt 2 meter amp, which I plug my 2 meter hand-held into.
Next is a Pakrat™ packet radio controller, for doing digital communication modes with the IC-735.
On top is a spectrum analyzer, can’t recall the brand. It plugs into the wideband IF output of the IC-735 or R7000, so I can see radio activity that is near my current frequency. These days, such functionality is built-in on most transceivers.
On the roof is a Butternut multi-band vertical, an all-band Windom off-centre dipole fed by the remote antenna tuner and ladder line, and a 5/8ths-wave 2 meter vertical.
This stuff is in the garage, waiting for time to put it on the air again. I haven’t been active in years, unfortunately. Photography takes a lot of time away from ham radio — and farming takes all the time away from both of them!
Hi
This is excellent . I am collecting the different parts to assemble it also. I see you have a 60 mm macro on your D800, . I also have a D800
Is this the best focal length for 35 mm and 120 rolls? I don’t have any macro so I need to find a used one
Thanks again
The 60 or 105 or anything in between is fine, whatever good used one you can find. For 35mm, the 60 is close enough to the film that I take off the lens hood, but not a big deal. For 120, it’s probably a bit easier using the 60 as the 105 would be higher on the copy stand, but still workable. If you ever got into large format the 60 would be preferred because of the distance.
I also use the stand for copying photos and magazines. In those cases the 60 is definitely preferable. It’s also easy to swivel the Super Clamp around so you can photography a larger item on the floor.
I was thinking if it’s possible to design a 3d printed tube to attach to a macro lens. In the end of the tube something to fix the slide to be scanned.
In that way you have a defined distance from the sensor to the slide, so the focus point will be the same.
Thingiverse is being wacky at the moment (veeeery slow loading), but I know ProfHankD has done this so it should be findable somewhere in About profhankd - Thingiverse
I haven’t tried 1/2" pipe. While it would be strong enough, my concern would be with vibration, especially with 4x - 10x magnification.
I recently purchased a Benro geared head for a project photographing paintings. It works well to get exact alignment with the mirror method, but wasn’t compatible with the Super Clamp because of the position of the Benro adjustment knobs. To get around that I rigged up another system. It works well but is just a rough prototype which I’ll clean up later.
Wow, that’s very ingenious, thank you for sharing! I’m not very resourceful on my own, so your having shared pics of your setup is especially helpful.
I guess the 1/2" pipe I’m using was marked as 1/2", but the OD is actually about 1". I tested a small Neewer tripod ball head I have, and no matter how much downward pressure I exert on it, it doesn’t budge a millimeter, which really surprised me: I don’t think I’ll need a separate QR Clamp and leveling base after all, and the focus rail is nice because it has Arca Swiss-compatible grooves along the length of the unit: clamping the rail into the ball head’s QR Clamp should be more secure than attaching using the QR plate’s 1/4-20 thread.
I plan on using a combination of mirror lockup and a wired remote switch, so I’m hoping it should be stable enough; the copy stand base will be made of solid 3/4" hardwood (old table leaf insert), and it will have rubber feet attached to the underside.
The one thing I was thinking of today, was putting another floor flange on top of the mounted pipe, and threading something through the screw holes to tether the ball head: hopefully that would reduce any strain on the Super Clamp’s 3/8-16 stud attachment point to the ball head.
I’m intending to photograph flora/fauna inclusions in amber from worldwide localities, and I cannot be too careful: the subjects are incredibly fragile, and some are extremely rare and expensive. One slip of the camera, and I’d be left with a pile of powder!
The 3/4" steel pipe has an outside diameter of about 1", so probably the 1/2" pipe has an OD of about 3/4". I agree that you probably don’t need a leveling base.
To avoid vibrations I use live view plus a 5-second timer. It works well. Live view will also provide more accurate focusing than through a mirror and prism, although it’s also dependent on the individual lens. I have some Nikon lenses that require a lot of AF tine tune, such as -20 on a scale of +20 to -20. Others are right on, but live view is always accurate whether or not the lens has been calibrated.
Photographing amber sounds like a really cool project. I’ve found lots of amber from the late Cretaceous in the Alberta badlands, but nothing exciting inside. On the other hand I’ve found lots of dinosaur, turtle, shark, fish, crocodile and maybe pterosaur fossils. Our best finds are a Daspletosaurus (described by palaentologists as the best-preserved tyrannosaur from the Campanian in North America), a large soft-shelled turtle with the most complete skeleton of its species and an ankylosaur.
Having a focusing rail I think would be really useful for photographing amber since you’d need to change the magnification frequently. Shooting film it’s not that important as you only need to change magnification when changing film sizes.
The Super Clamp and its 3/8 stud are pretty strong. You might just try it as is first, before supporting it from the top as well.
Do you have some amber shots you can share? I’d love to see them. What’s your lighting setup for the amber?
Thank you so much for your insight! I’ve been really worried as to how sturdy/durable the components of my setup would be; in particular, the attachment points of the 1/4-20 and 3/8-16 screws. I’ve read of the brass studs (Manfrotto Super Clamp) breaking off at the base of the threaded portion, but I managed to find a steel stud (Flashpoint Super Clamp).
That’s incredible that you’ve discovered and collected so many amazing vertebrate fossils and amber! I recently obtained about 40 grams of raw clear amber from the Blakeburn, Coalmont area in B.C., but I haven’t gotten around to prepping any of them for inspection. I wish we had amber here in Wisconsin, but there are very few sources of good minerals to collect here (thank you, glaciers). I’m always looking to obtain amber from as many unique localities as possible; it would be awesome to have some from Alberta!
I hope to use the focus rail to take incremental shots for use with stacking software (Zerene Stacker). I was inspired to try this approach by a fellow member (holdinghistory) on The Fossil Forum, and he has some amazing shots that he posted on his thread (New Amber Photography Setup) using Zerene.
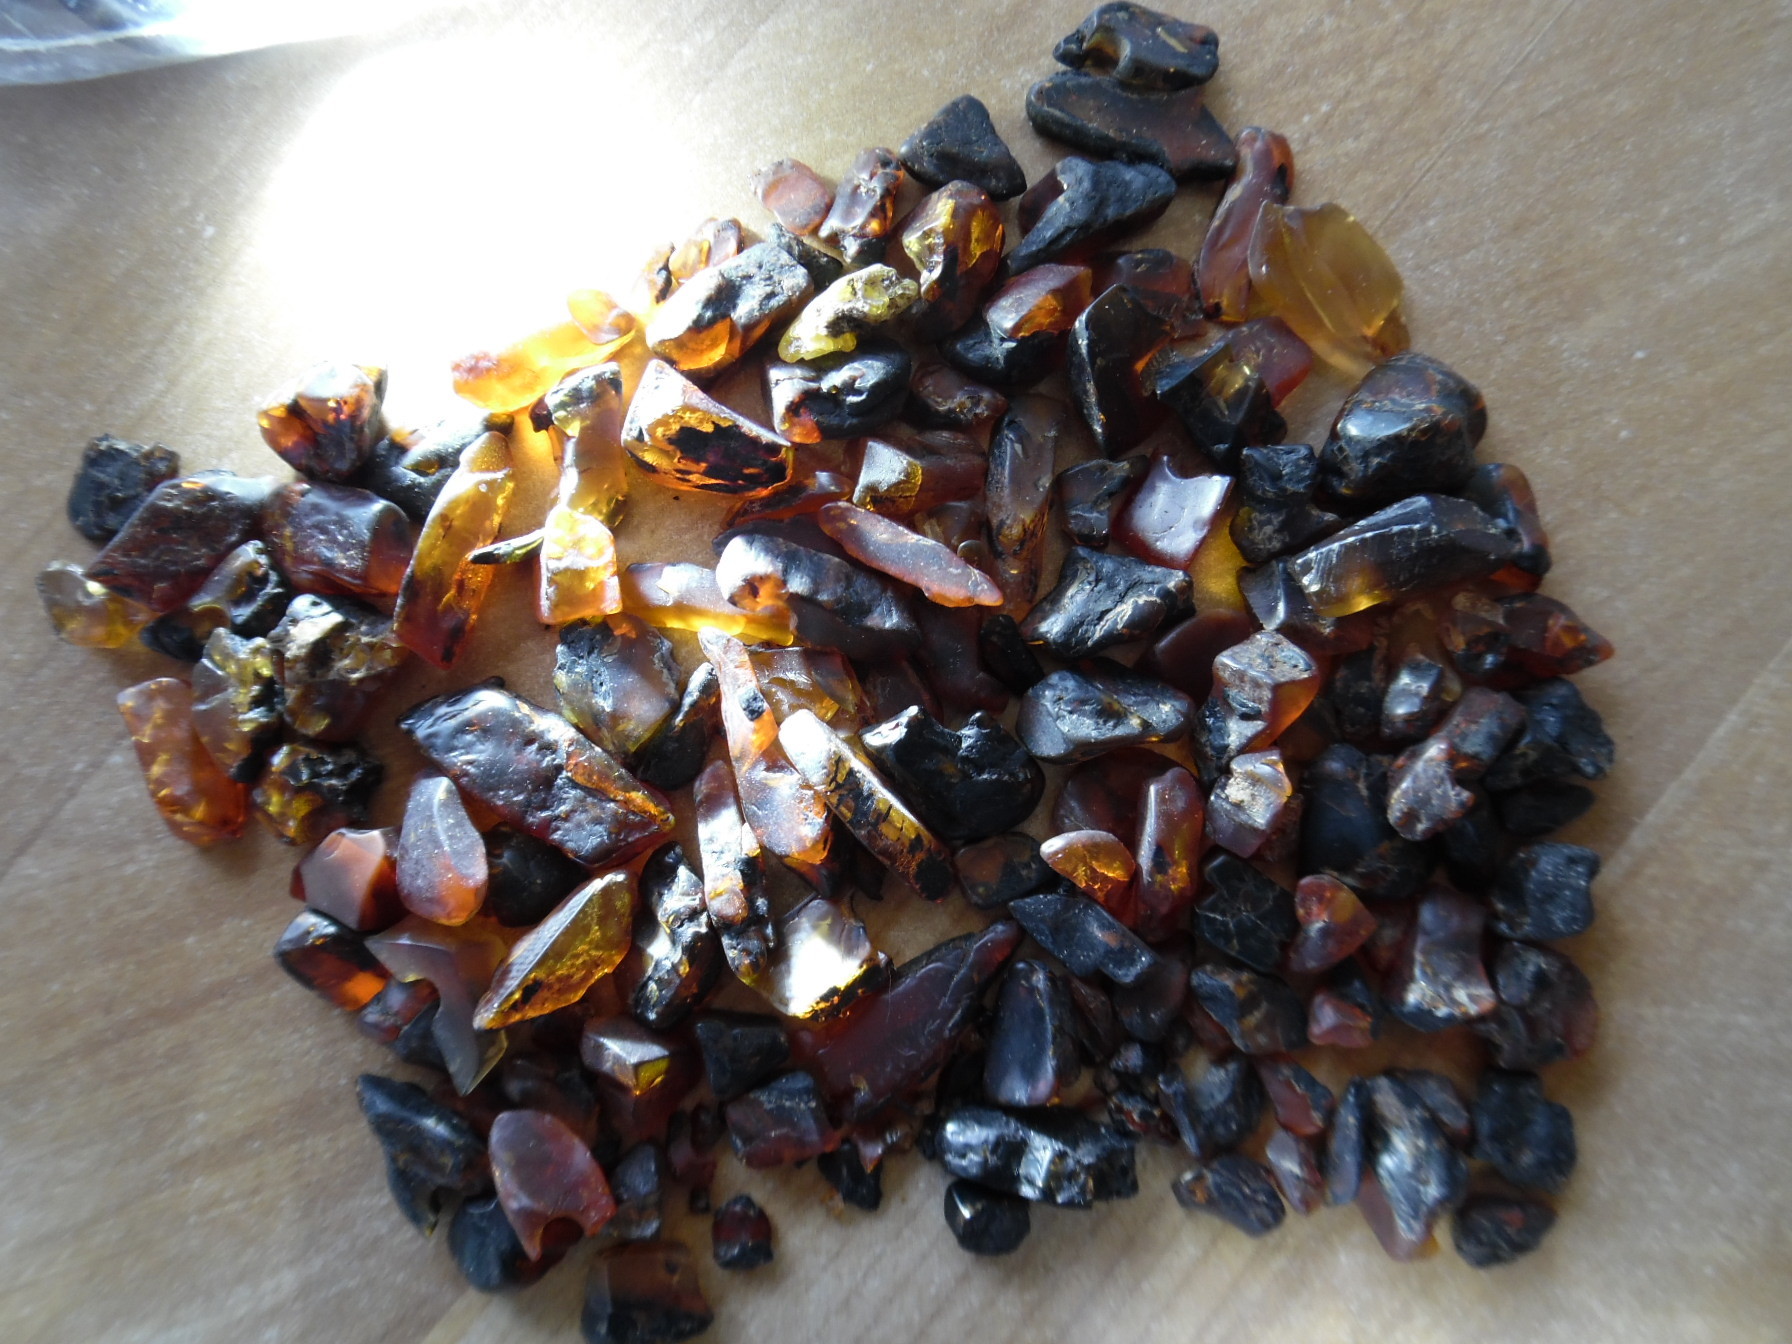
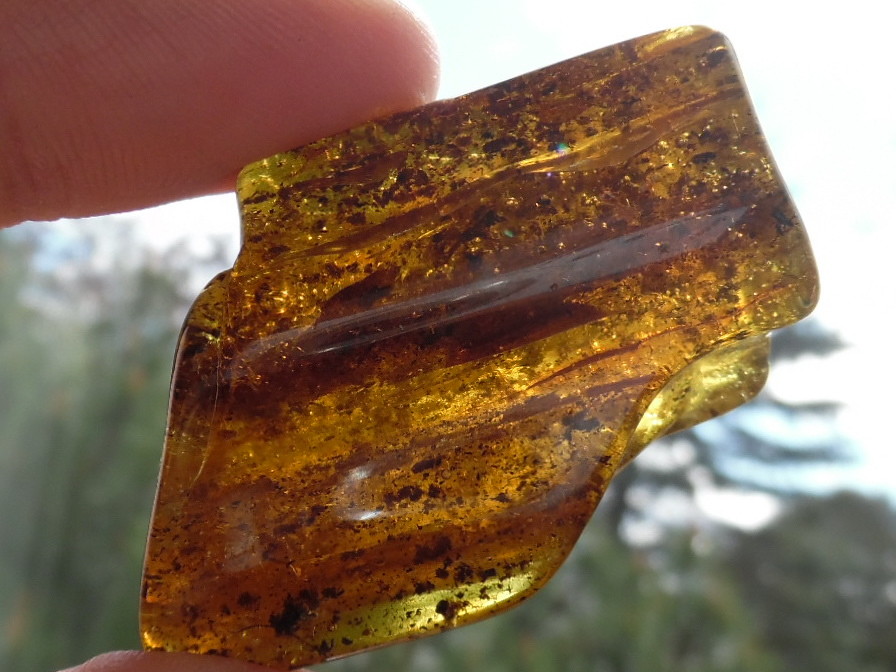
I don’t have any setup ready for photographing amber inclusions, and I haven’t really taken a lot of pictures of my amber (mostly just working/polishing the amber itself), but I do have a few pictures, mostly on my Instagram account. Here’s a neat image of some raw blue amber I have from West Sumatra (the blue coloration is surface fluorescence), but a comprehensive description of its origin is on my Facebook page (Kaegen Lau). I’m just using a Quantum 140 lumen LED penlight in the picture, but with my future setup, I plan on using three NextLED flexible LED lights to illuminate the inclusions (as well as a circular microscope lighting base). Some other photos of Rovno amber (Ukraine); some insect inclusions here and there, but I haven’t made any ID’s yet.
I hope it’s okay to post these several images here; they’re a little off-topic, so I apologize in advance.
Amber is beautiful. We do have some here, but I haven’t yet found a piece with a mosquito gorged with tyrannosaur blood…
The glaciers came through Alberta as well, of course, removing a few thousand feet of sediment. It leaves us in many places with a couple hundred feet of ice age debris left when the glaciers receded, with the late Cretaceous sandstone and bentonite right below that, dating back 70 to 80 million years. Usually we just walk fast over the ice age debris, but I did find a great chunk of a woolly mammoth tooth in the debris.
I haven’t photographed amber before, but wonder if there would be a benefit to using cross polarization to eliminate unwanted reflections and see better into the amber. I use cross polarization a lot with photographing paintings for clients.
I haven’t heard of the Manfrotto brass stud failing, but it can’t hurt to get a steel one. I use a stainless steel 3/8" eye bolt for my makeshift plywood clamp and that setup is pretty bombproof.
Awesome! I have a rockhounding buddy that had found a partial mastodon tooth in a gravel pit years ago near the St. Croix river in Wabasha, Minnesota; I’ve been collecting with him at that pit a couple times for Lake Superior agates, as well as agatized wood (the few pieces I found actually have some visible grain to them, and a perfect woody exterior texture/pattern). I haven’t been out field collecting for years, sadly.
I think my nearest amber locality in the States, that I’ve read of, is in southern Illinois; as it happens, this is the oldest amber on earth (320 Ma). Here’s a fascinating article on it from October '09: https://www2.illinois.gov/dnr/OI/Documents/March10Amber.pdf. Unfortunately, this specific occurrence is not open to the public.
Definitely, cross-polarization would be excellent for extreme macro photography; especially so with having to use bright light sources on highly polished pieces of amber. Unfortunately, the only thing close to that that I can afford is my Hoya 52 mm Linear Polarizer Filter for my Canon 60 mm f/2.8 USM lens. I think I could include such a filter in my setup, but my current lens > microscope objective adapter wouldn’t allow it (using a Pentax-A 645 200mm f/4 lens). It would be very helpful though!
Hopefully I’ll be able to get my setup complete soon; I have the materials to make the copy stand, but still need to get the clamp, focus rail, microscope objectives (4x and 10x infinity plan), and the lights. It’ll be a while, but I can’t wait to get it done!